Manually Making Navigation Meshes in Unreal 4
n.b. I’m neither a game developer nor a professional c++ developer, corrections most welcome.
Background and Motivation
Unreal Engine comes with a wrapper around a pair of Open Source navigation libraries called Recast and Detour. Recast will find all the things in the scene and construct a navigation mesh broken up into a grid of tiles, then hand that mesh over to Detour which can then perform pathfinding queries. For the vast majority of games this system works well, as the system can be tweaked to handle most use cases:
- Smaller, static worlds can generate the navmesh and save it at build time
- Large worlds can use navigation invokers to only generate navmesh tiles around things that need pathfinding
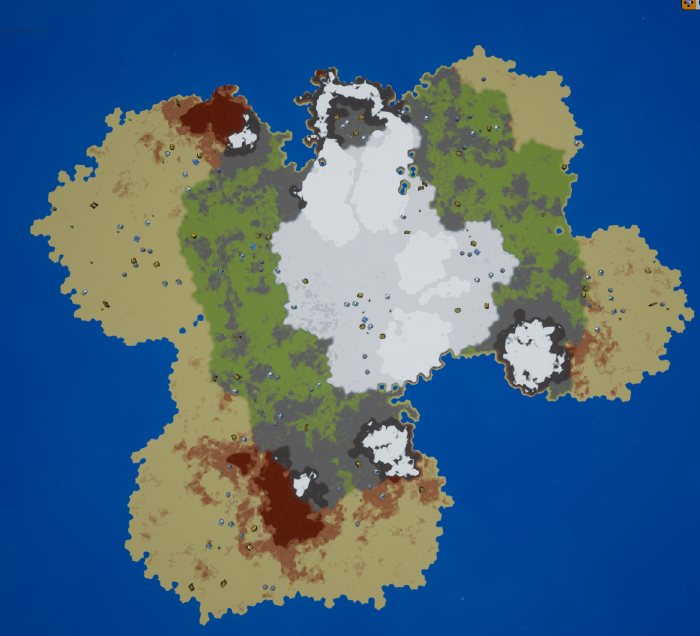
While generating a world map of 2 square km, I ran into problems because a case that isn’t covered well is strategy games with random maps.
The reason for this is that in a strategy context it’s not uncommon to request a path from one side of the map to the other, and it takes Recast several minutes to build the navigation tiles for the complete map. Recast works by voxelising the scene so it can do a lot of work in parallel, but even with a few threads dedicated to navigation it takes more than a minute to generate the complete navmesh. This means for a strategy game with a large random map there’s a few easy options:
- Wait a minute or more before starting the game so the full navmesh can generate
- Use whatever parts of the mesh are currently available to make a best effort at creating a path
- Make Recast go faster by reducing the voxel resolution
The first option is generally not acceptable - my personal feeling is that load times should be around 10 seconds or less whenever possible.
While the second option may seem attractive, for cases where the path is a long distance and the map is full of obstacles, there’s going to be cases where an incomplete path sends a unit in the complete wrong direction.

We could reduce the resolution of Recast by increasing the voxel size to make it a bit faster, but having an inaccurate navmesh in a strategy game is unlikely to be very pleasant, and I didn’t find the time savings to be very large without lowering the resolution much too far for my liking when I tested this method.
Proposed Solution
So given a strategy game with random maps where we want to be able to perform long range pathfinding in an efficient manner without having a long startup time, it seems like Unreal’s built in system is not going to help us a whole lot. In fact, while Recast isn’t really helping is much, Detour is still perfectly fine, so what if we could make our own navmesh and provide that to Detour? That would save us reinventing an absolute ton of pathfinding wheels (aside: I also tried that and it didn’t go at all well). As it turns out, Unreal isn’t exactly set up to make that process easy, but it is possible without any engine modifications.
This post will go over creating the most basic grid mesh to get started, but the final goal is to have a navigation mesh that fits straight onto our procedural map like this:

Getting Started
First, we’re going to make a new class that derives from ARecastNavMesh. Under normal circumstances this class is responsible
for calling Recast to create tiles and then adding tiles within the navigation bounds to Detour. Since we can reuse almost every
aspect of the existing system there’s no need to start from scratch. The ARecastNavMesh instance then contains a pointer to
another class called FPImplRecastNavMesh which I’ll call PIRNM for brevity. My impression is that this was meant to be temporary
but has for some reason stuck around far longer than planned. In any case, the PIRNM is what contains the Detour
nav mesh itself, and we can grab it simply by calling GetRecastNavMeshImpl(). The Detour Nav Mesh itself is at
FPImplRecastNavMesh::DetourNavMesh and is public, so with that, we’re ready to start monkeying with Detour.
Our header should look something like this:
#pragma once

#include "CoreMinimal.h"
#include "RecastNavMesh.h"
#include "Detour/DetourNavMeshBuilder.h"
#include "ManualDetourNavMesh.generated.h"

DECLARE_LOG_CATEGORY_EXTERN(LogManualNavMesh, Log, All);

UCLASS(notplaceable, Blueprintable)
class UPCGT_API AManualDetourNavMesh : public ARecastNavMesh
{
	GENERATED_BODY()

public:
    UFUNCTION(BlueprintCallable, Category = "ManualRecastNavMesh")
    bool MakeManualNavMesh();
};
And implementation like this:
#include "ManualDetourNavMesh.h"

DEFINE_LOG_CATEGORY(LogManualNavMesh)

bool AManualDetourNavMesh::MakeManualNavMesh()
{
    FPImplRecastNavMesh* PIRNM = GetRecastNavMeshImpl();

    if (PIRNM)
    {
        UE_LOG(LogManualNavMesh, VeryVerbose, TEXT("ManualNavMesh found PIRNM"));
    }
    else {
        UE_LOG(LogManualNavMesh, Error, TEXT("ManualNavMesh failed to find PIRNM"));
        return false;
    }
    return true;
}
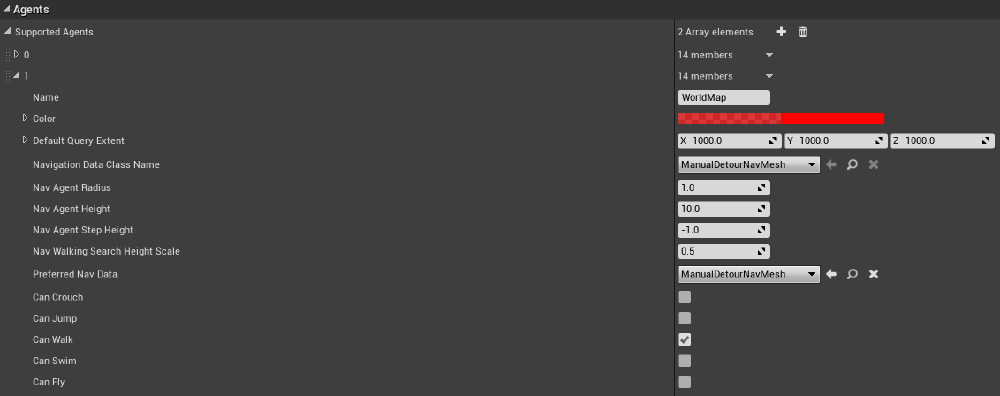
We then need to set our new class as the preferred ANavigationData provider for a new type of agent in the
Navigation System part of project settings:
Intro to Detour
dtFree, dtAllocNavMesh
Detour has its own system for allocating memory. Almost everything uses C style memory management (malloc/free) but the calls
themselves can be overridden to use Unreal’s memory allocators under FMemory. You can see these in PimplRecastNavMesh.cpp
minus some profiling lines:
static void* DetourMalloc(int Size, dtAllocHint)
{
	return FMemory::Malloc(uint32(Size));
}

static void* RecastMalloc(int Size, rcAllocHint)
{
	return FMemory::Malloc(uint32(Size));
}

static void RecastFree( void* Original )
{
	FMemory::Free(Original);
}

struct FRecastInitialSetup
{
	FRecastInitialSetup()
	{
		dtAllocSetCustom(DetourMalloc, RecastFree);
		rcAllocSetCustom(RecastMalloc, RecastFree);
	}
};
static FRecastInitialSetup RecastSetup;
dtAllocSetCustom and rc equivalent are setting a static function pointer within DetourAlloc.cpp to the Unreal memory management
functions. This is important because at various stages we’ll call methods in Detour to initialise data structures that will house its
nav mesh, and if we don’t use Unreal’s memory management to do so it will be invisible to the rest of the engine, which could lead to
strange errors due to memory being overwritten or freed too early. If you start seeing weird memory errors then copying the code above
into your own project may help.
In our MakeManualNavMesh function we’ll now remove any existing dtNavMesh and allocate a new one.
if (PIRNM->DetourNavMesh != nullptr)
{
    dtFreeNavMesh(PIRNM->DetourNavMesh);
}

// Allocates memory but doesn't initialise
PIRNM->DetourNavMesh = dtAllocNavMesh();
World Bounds and Cells
Now that we have some memory allocated for our NavMesh it’s time to break the world up into chunks. First we define the size of the world, and the first thing to notice is that Detour uses the traditional component ordering where Y is up/down. So we’ll make some bounds like this:
const float bmax[3] =
{
    Max.X,
    Max.Z,
    Max.Y
}

const float bmin[3] =
{
    Min.X,
    Min.Z,
    Min.Y
};
Now we need to break up this world. Detour does this via two levels: Tiles and Cells. The world is composed of a 3d grid of tiles, and
each tile is composed of cells. To begin with, define TileCount as the number of tiles in each direction (we’ll assume the world is square for now) and use that to determine the size of each tile TileSize. Once we have this we’ll pick some values to get started.
float TileSize = (Max.X - Min.X) / TileCount;

dtNavMeshParams NMParams;
memset(&inParams, 0, sizeof(NMParams));
NMParams.orig[0] = bmin[0];
NMParams.orig[1] = bmin[1];
NMParams.orig[2] = bmin[2];
NMParams.tileWidth = TileSize;
NMParams.tileHeight = TileSize;
NMParams.maxTiles = (TileCount+1)*(TileCount+1);

// This is the maximum number of polygons per tile. If you already know the max number you can save some memory by reducing this.
NMParams.maxPolys = 0xffff;

dtStatus status = PIRNM->DetourNavMesh->init(&NMParams);
dtStatus
Now we’ve got our NavMeshParams ready we can initialise the Detour Nav Mesh, but it’s going to return a status code that we
probably want to be able to interpret if there’s a problem. In DetourStatus.h there’s a bunch of error code definitions,
which we can convert to a string for easy reading in our log:
String AManualDetourNavMesh::AManualDetourNavMesh::DetourStatusToString(unsigned int status)
{
  FString Ret = FString();
  if ((status & DT_SUCCESS) != 0)
    Ret.Append(FString(TEXT(" DT_SUCCESS")));
  if ((status & DT_FAILURE) != 0)
    Ret.Append(FString(TEXT(" DT_FAILURE")));
  if ((status & DT_IN_PROGRESS) != 0)
    Ret.Append(FString(TEXT(" DT_IN_PROGRESS")));
  if ((status & DT_STATUS_DETAIL_MASK) != 0)
    Ret.Append(FString(TEXT(" DT_STATUS_DETAIL_MASK")));
  if ((status & DT_WRONG_MAGIC) != 0)
    Ret.Append(FString(TEXT(" DT_WRONG_MAGIC")));
  if ((status & DT_WRONG_VERSION) != 0)
    Ret.Append(FString(TEXT(" DT_WRONG_VERSION")));
  if ((status & DT_OUT_OF_MEMORY) != 0)
    Ret.Append(FString(TEXT(" DT_OUT_OF_MEMORY")));
  if ((status & DT_INVALID_PARAM) != 0)
    Ret.Append(FString(TEXT(" DT_INVALID_PARAM")));
  if ((status & DT_BUFFER_TOO_SMALL) != 0)
    Ret.Append(FString(TEXT(" DT_BUFFER_TOO_SMALL")));
  if ((status & DT_OUT_OF_NODES) != 0)
    Ret.Append(FString(TEXT(" DT_OUT_OF_NODES")));
  if ((status & DT_PARTIAL_RESULT) != 0)
    Ret.Append(FString(TEXT(" DT_PARTIAL_RESULT")));
  if ((status & DT_INVALID_CYCLE_PATH) != 0)
    Ret.Append(FString(TEXT(" DT_INVALID_CYCLE_PATH")));
  return Ret;
}
Adding Tiles
We can now go through our grid and create one tile per grid cell. We’ll make a new function to create the data itself:
unsigned char* BuildTileMesh(dtNavMesh* TiledNavMesh, const int32 tx, const int32 ty, const float* bmin, const float* bmax, int32 &NavDataSize);
which will return a blob of data and put its size into NavDataSize. This data can then be added as a new tile to the dtNavMesh we created earlier. When you build the navigation mesh normally in UE4 and see a new tile appear, this is the same method being called, only its contents were created by Recast. Note that the tiles are indexed using x,y,z - we could be making a 3d grid of tiles, but we’ll just work with 2d at the moment.
Once we’re done, we tell our parent class to update drawing so we can see the result in the editor. The tile minimums and maximums are once again in the Detour XZY ordering.
for (int y = 0; y < TileCount; ++y)
{
    for (int x = 0; x < TileCount; ++x)
    {
        float TileBmin[3] = {
            bmin[0] + x * TileSize,
            bmin[1],
            bmin[2] + y * TileSize,
        };

        float TileBmax[3] = {
            bmin[0] + (x + 1) * TileSize,
            bmax[1],
            bmin[2] + (y + 1) * TileSize,
        };

        int dataSize = 0;

        unsigned char* data = BuildTileMesh(PIRNM->DetourNavMesh, x, y, TileBmin, TileBmax, dataSize);
        if (data)
        {
            // Remove any previous data (navmesh owns and deletes the data).
            PIRNM->DetourNavMesh->removeTile(PIRNM->DetourNavMesh->getTileRefAt(x, y, 0), 0, 0);

            // Let the navmesh own the new tile data.
            status = PIRNM->DetourNavMesh->addTile(data, dataSize, DT_TILE_FREE_DATA, 0, 0);
            if (dtStatusFailed(status))
            {
                UE_LOG(LogManualNavMesh, Error, TEXT("Tile %d,%d creation failed with status %s"), x,y,*DetourStatusToString(status))
                dtFree(data);
            }
        }
    }
}

UpdateDrawing();

return true;
Building Tiles
For this example we’re going to make a basic grid tile which is a single square polygon with 4 vertices and 2 triangles, commonly known as a ‘quad’, that connects to its neighbours. The shortlist of things we’re going to have to do is:
- Set some info for the tile like bounds, units, location in the grid etc.
- Determine how many vertices there are
- Determine the maximum number of vertices per polygon
- Store our vertex data
- Store our polygons to show which vertices are in each polygon
- Store the border information to show which edges of polygons are next to each other within the tile
- Store the portal information to show which edges of polygons are on the edge of the tile and can be traversed
- Store which polygons are walkable and which are impassable
- Store other per-polyon flags
- Pass all of these to Detour and so it creates a nav mesh tile, and then return that
Nav Mesh Creation
To create a tile, the dtNavMeshCreateParams struct is passed to Detour. There’s some simple parameters we should be able
to set initially without much work - a lot of these will be familiar since they’re also used when creating a navmesh using
the usual method. We’re only going to have a single layer, so tileLayer can be 0, and tileX and tileY tell Detour where in
the grid this tile will be. The rcVcopy method is simply copying the 3 floats for the bounds into the struct.
NavData is where we’re going to eventually put our data and will be returned at the end when we’re done.
unsigned char* AManualDetourNavMesh::BuildTileMesh(dtNavMesh* TiledNavMesh, const int32 tx, const int32 ty, const float* bmin, const float* bmax, int32 &NavDataSize)
{
	dtNavMeshCreateParams TileParams;
	FMemory::Memset(&TileParams, 0, sizeof(TileParams));
	unsigned char* navData = 0;
	int navDataSize = 0;

	TileParams.walkableHeight = WalkableHeight;
	TileParams.walkableRadius = WalkableRadius;
	TileParams.walkableClimb = WalkableClimb;
	TileParams.tileX = tx;
	TileParams.tileY = ty;
	TileParams.tileLayer = 0;
	rcVcopy(TileParams.bmin, bmin);
	rcVcopy(TileParams.bmax, bmax);
	TileParams.cs = CellSize;
	TileParams.ch = CellHeight;
	TileParams.buildBvTree = true;
}

Vertices per polygon
While TileParams.vertCount is fairly self explanatory, one of the key considerations when creating the mesh is the number of vertices
to allow per polygon - nvp. Detour will allocate [number of polys] * 2 * [vertices per polygon] * sizeof(unsigned short) to
store all the polys in the mesh, so if you have very uneven polygon vertex counts this can waste a lot of memory. In our
little example mesh we only have one polygon and it has 4 vertices so this is very easy to answer, but when constructing
meshes for more complex cases that may not be grids, this might need careful thought.
Since the vertices are indexed using shorts, we can’t exceed have more than 32768 vertices, and we can’t have less than 3. It’s unlikely you’ll hit these problems in practice but they can happen during development.
	TileParams.vertCount = 4;
	TileParams.nvp = 4;

	if (TileParams.vertCount < 3)
	{
		UE_LOG(LogManualNavMesh, Error, TEXT("Tile %d,%d vertcount %d too low to create tile"), tx, ty, TileParams.vertCount);
		return nullptr;
	}

	if (TileParams.vertCount >= 0xffff)
	{
		UE_LOG(LogManualNavMesh, Error, TEXT("Tile %d,%d vertcount %d too high"), tx, ty, TileParams.vertCount);
		return nullptr;
	}

	int MaxPolys = 1;
Adding Vertices
Previously it was mentioned that Detour uses a different coordinate system to Unreal. There’s some helper methods in
RecastHelpers.cpp for converting between the two. It’s quite clear from looking at these that the coordinate system is
in fact -X,Z,-Y in Detour, but in addition the vertices are stored as unsigned short instead of the float that might
be expected.
Detour calculates the position using the short multiplied by cell size, this discretisation makes it less likely to have errors
far away from the origin and also makes it easier to snap the tiles together, but it means that we’ll not only need to convert
our Unreal vertices into the right coordinate space but also snap the vertex to the nearest cell. We have the cell size stored
in TileParams.cs so by taking the inverse of that we get the cell index, and after taking into account the negative coordinate
direction we can get the cell location.
The cell height is done slightly differently since it uses CellHeight TileParams.ch, and will be covered in a later post
when we move beyond the basic grid.
	unsigned short* verts = (unsigned short*)FMemory::Malloc(sizeof(unsigned short)*TileParams.vertCount * 3);

	const float ncsinv = -1.0f / TileParams.cs;
    const float chinv = 1.0f / TileParams.ch;

    // Source vertices in Unreal Coordinates
	TArray<FVector> UEVertices;
	UEVertices.Reserve(TileParams.vertCount);
	UEVertices.Add(FVector(Bounds.Min, 0.f));
	UEVertices.Add(FVector(Bounds.Min.X, Bounds.Max.Y, 0.f));
	UEVertices.Add(FVector(Bounds.Max, 0.f));
	UEVertices.Add(FVector(Bounds.Max.X, Bounds.Min.Y, 0.f));

	// Insert vertices into vert array in Detour Coordinates
	for (int32 i = 0; i < TileParams.vertCount; i++)
	{
		auto& V = UEVertices[i];
		verts[i * 3] = (unsigned short)(FMath::FloorToInt((TileParams.bmin[0] + V.X)*ncsinv));
		verts[i * 3 + 1] = (unsigned short)(FMath::FloorToInt((V.Z*TileParams.bmin[1] * -1.0f - TileParams.bmin[1])*chinv));
		verts[i * 3 + 2] = (unsigned short)(FMath::FloorToInt((TileParams.bmin[2] + V.Y)*ncsinv));
	}
	TileParams.verts = verts;

Adding Polygons
Now that we have some vertices to work with we can add our polygon. In detour all polygons must be convex hulls, presumably
so that calculating whether a point is inside is relatively cheap.
Each polygon gets a block of memory nvp*2
long to store its data. Fortunately there’s some documentation available on how this works
here so we
don’t have to spend too long guessing how to lay things out.
The first nvp entries are the indices of the vertices within the polygon, and the second nvp entries contain data
about what the edges are connected to. Since there’s only one polygon in the tile we don’t need to think about neighbouring
polygons (we’ll get to that later) we can initially set all our edges to RC_MESH_NULL_IDX which indicates that the edge
is a border. In the next step we’ll replace some of these to indicate they’re a portal to a neighbouring tile.
	// This is list of vert indices
	// Why is the size multiplied by 2? If every tri was a poly it would still only be maxtris in length...
	unsigned short* polys = (unsigned short*)FMemory::Malloc(sizeof(unsigned short)*MaxPolys*TileParams.nvp * 2);
	memset(polys, 0xff, sizeof(unsigned short)*MaxPolys*TileParams.nvp * 2);

	// Vert indices
	polys[0] = (unsigned short)0;
	polys[1] = (unsigned short)1;
	polys[2] = (unsigned short)2;
	polys[3] = (unsigned short)3;
	// Solid border
	polys[4] = RC_MESH_NULL_IDX;
	polys[5] = RC_MESH_NULL_IDX;
	polys[6] = RC_MESH_NULL_IDX;
	polys[7] = RC_MESH_NULL_IDX;
    TileParams.polyCount = 1;
	TileParams.polys = polys;
Portals between tiles
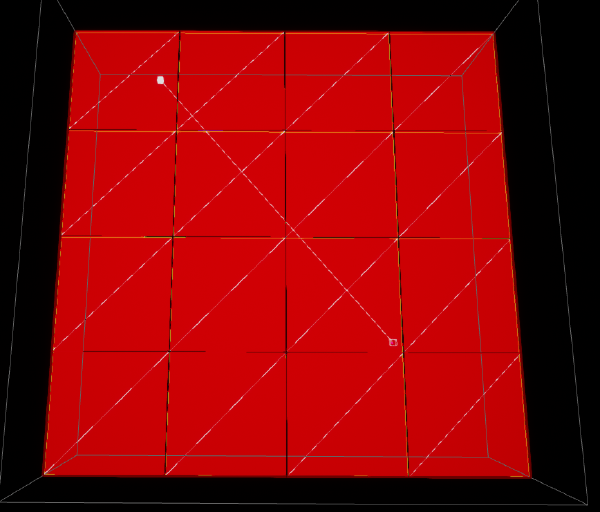
If we skip to the end and create the tile then add the tile to the navmesh without adding the code below, what we’ll see is this:
« boredered tiles »
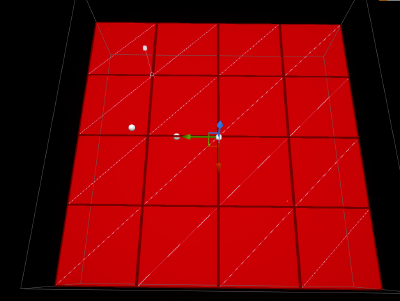
Which shows that there are edges of the navmesh between each tile. This is because we need to tell Detour which polygon edges are on
the edge of a tile so that it can search neighbouring tiles for potential connections. I wasn’t able to find any documentation on
this process, but in DetourNavMeshBuilder.cpp there’s a method called dtCreateNavMeshData that we’ll call a little later, and
within that we can see the following:
// in dtCreateNavMeshData
		for (int j = 0; j < nvp; ++j)
		{
			if (src[j] == MESH_NULL_IDX) break;
			p->verts[j] = src[j];
			if (src[nvp+j] & 0x8000)
			{
				// Border or portal edge.
				unsigned short dir = src[nvp+j] & 0xf;
				if (dir == 0xf) // Border
					p->neis[j] = 0;
				else if (dir == 0) // Portal x-
					p->neis[j] = DT_EXT_LINK | 4;
				else if (dir == 1) // Portal z+
					p->neis[j] = DT_EXT_LINK | 2;
				else if (dir == 2) // Portal x+
					p->neis[j] = DT_EXT_LINK | 0;
				else if (dir == 3) // Portal z-
					p->neis[j] = DT_EXT_LINK | 6;
			}
			//...
		}
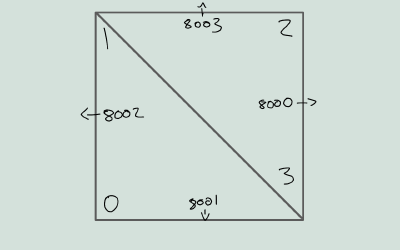
So in order to define a portal we need to have a value of 0x800[0|1|2|3], which will then be converted to DT_EXT_LINK | [0|2|4|6].
What’s slightly odd about this is that DT_EXT_LINK is 0x8000, so essentially all that’s happening is the following conversion:
- 0x8000 -> 0x8004
- 0x8001 -> 0x8002
- 0x8002 -> 0x8000
- 0x8003 -> 0x8006
Since we’ve got such a simple polygon layout for our tiles it’s fairly easy to create the portals by determining whether this tile is at the start or end of a row or column and if not setting the edge on the appropriate side.
	//x-
	if (tx != 0)
	{
		polys[6] = 0x8000;
	}
	//x+
	if (tx != TileCount - 1)
	{
		polys[4] = 0x8002;
	}
	//z+
	if (ty != TileCount - 1)
	{
		polys[7] = 0x8001;
	}
	//z-
	if (ty != 0)
	{
		polys[5] = 0x8003;
	}
When a tile is added, Detour will automatically search for overlapping segments on the portal edges of neighbouring tiles
and create a segment link to allow traversal. This happens in DetourNavMesh.cpp in dtNavMesh::addTile via createSegmentLinks
but isn’t otherwise documented as far as I know.
Polygon Areas
Each poly should be assigned an area, though the only two settings that seem to be available are RC_NULL_AREA which is '0'
and RC_WALKABLE_AREA which somewhat amusingly is '?'. Since we don’t have any impassable sections we can just set our
polygon to walkable.
	unsigned char* PolyAreas = (unsigned char*)FMemory::Malloc(sizeof(unsigned char)*MaxPolys);
	FMemory::Memset(PolyAreas, RC_WALKABLE_AREA, sizeof(unsigned char)*MaxPolys);
	TileParams.polyAreas = PolyAreas;
Polygon Flags
If we run a test now, we almost get the right result, but there’s one more thing to set and it’s unfortunately
not documented anywhere I could find. The Detour documentation defines polyFlags as “User defined flags” so
this may be specific to Unreal, but they’re not really mentioned anywhere.
If you just want the right value, set it to 0x0001 and everything should work.
	unsigned short* PolyFlags = (unsigned short*)FMemory::Malloc(sizeof(unsigned short)*MaxPolys);
	FMemory::Memset(PolyFlags, 0x0001, sizeof(unsigned short) * MaxPolys);
	TileParams.polyFlags = PolyFlags;
I wanted to know why I was getting a result that was almost-but-not-quite correct so I’ll attempt to explain why. Initially
I tried setting the flags to 0x0000 and 0xffff in the hope that no/all flags needed setting, but I got the result shown below with 0xffff and no paths at all with 0x0000.
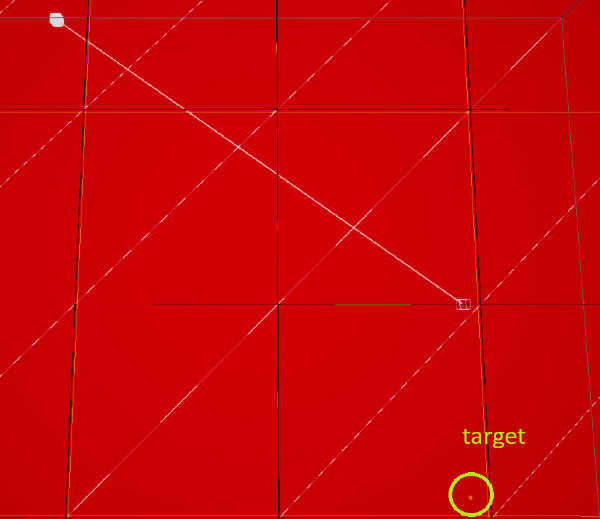
What happens with 0xffff
is the path is found between the two points with length 5, but then at some point the final segment is removed and I get a
path of length 4 result that looks like it’s just decided to ignore the last tile. What’s happening is when we make a request
to Unreal for a path from A to B, it calls dtNavMeshQuery::findPath which gives us a path through the graph, but not necessarily
the most efficient straight line path. The straight line path that we’re used to seeing is the result of string pulling within
FPImplRecastNavMesh::PostProcessPath, and up the top of that method there’s a block under // check if navlink poly at end of path is allowed that’s going to check the flag of the final polygon against ARecastNavMesh::GetNavLinkFlag() and reduce the path length
by one if it matches.
The only way I discovered 0x0001 as the correct value was inspecting the polyFlags array with a breakpoint when building a normal
navmesh using Recast. Perhaps I’ll find out when it’s appropriate to set a polygon as a nav link at a later time, but for
now everything can just be 0x0001.
The Detail Mesh
Detour supports having a detail mesh to add detailed height data to polygons. Since our test is flat, we don’t need any of this but the documentation is here. Notably the detail meshes store their vertices using floating point instead of cells.
	// Will be created by the init method based on the base poly
	TileParams.detailMeshes = 0;
	TileParams.detailVerts = 0;
	TileParams.detailVertsCount = 0;
	TileParams.detailTris = 0;
	TileParams.detailTriCount = 0;
Create the nav mesh data and return it
We’ve now successfully populated everything we need to create our Nav Mesh Data. It just returns a bool instead of the dtStatus
we were dealing with earlier. It will be responsible for allocating memory pointed to by navData, and the size of the allocation
will be in navDataSize. We need both of those to pass to AddTile, which completes our work manually making a Detour nav mesh!
	// Make the nav mesh
	if (!dtCreateNavMeshData(&TileParams, &navData, &navDataSize))
	{
		GLog->Log(TEXT("Could not build Detour navmesh."));
		return 0;
	}
	NavDataSize = navDataSize;
	return navData;
Testing
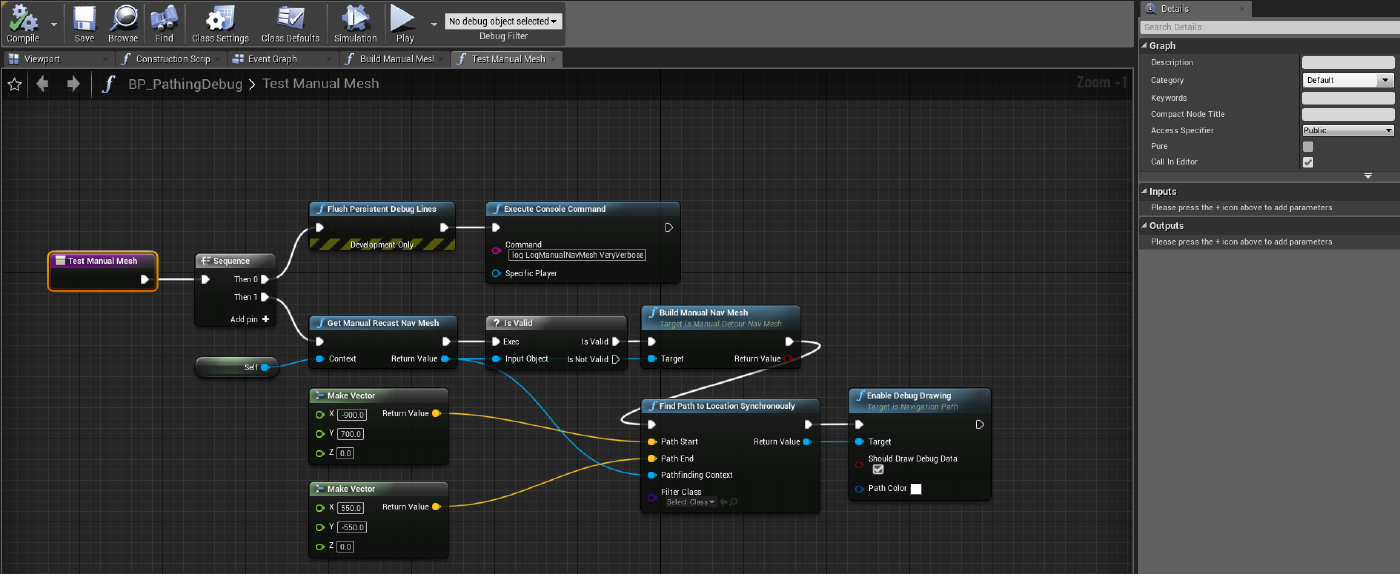
To make testing a bit easier we’ll create a function to grab the active ManualNavMesh in the world and then make an actor we can use to coordinate making the nav mesh and running a test.
// In the header
UFUNCTION(BlueprintCallable, Category = "ManualRecastNavMesh")
static AManualDetourNavMesh* GetManualRecastNavMesh(UObject* Context);

// In the .cpp
AManualDetourNavMesh* AManualDetourNavMesh::GetManualRecastNavMesh(UObject* Context)
{
	auto* NavSystem = FNavigationSystem::GetCurrent<UNavigationSystemV1>(Context);
	if (NavSystem)
	{
		for (auto *NavData : NavSystem->NavDataSet)
		{
			AManualDetourNavMesh* ManualNavMesh = Cast<AManualDetourNavMesh>(NavData);
			if (ManualNavMesh)
			{
				return ManualNavMesh;
			}
		}
	}
	return nullptr;
}
Then make a plain old actor blueprint and give it an editor callable function that makes the navmesh and attempts to find a path.
Notes
Clusters
There’s (at least) one thing missing from our navmesh that’s present in the recast-generated meshes and that’s clusters. I haven’t determined what the consequences are of not creating clusters yet, aside from there being some debug draw showing clusters that link to each other via arrows. I also haven’t figured out how to create clusters.

Speed comparison
With a cell size of 1.0 in a 1200x1200 volume and Tile Size 600. The best I seem to be able to do is selecting “Build Navigation” and then checking the log.
For our own class we can use:
bool AManualDetourNavMesh::SetNavMeshFromTriangulation(UPARAM(ref) FSGDelaunayTriangulation& Triangulation)
{
#if WITH_EDITOR
	const double timestart = FPlatformTime::Seconds();
#endif WITH_EDITOR

... // Build the navmesh

#ifdef WITH_EDITOR
	const double timeend = FPlatformTime::Seconds();
	UE_LOG(LogManualNavMesh, Verbose, TEXT("Manual Nav Mesh built in %f seconds."), timeend - timestart);
#endif // WITH_EDITOR
Recast: LogEditorBuildUtils: Build time 0:11
Manual: LogManualNavMesh: Verbose: Manual Nav Mesh built in 0.008837 seconds.
This has the RecastNavMesh accurate to the nearest centimetre, which is probably not necessary but it does give some indication of the potential benefits of manually building the mesh.
Conclusions + Further work
Working with Detour within Unreal can be quite difficult because there’s not a lot of documentation and the community is generally not focused on this kind of work. As mentioned earlier, the use case for this sort of thing is quite niche and that generally means that finding an answer to a question will mean reading the source and taking notes while breakpointing.
There is some documentation for Recast/Detour online, but I believe the vendored version within Unreal hasn’t been updated in quite a while so it can be slightly misleading at times.
While the results from this post are not particularly useful on their own, I’ll be extending it and will put up a sample project as a reference. The next chapter will look at changing the mesh to have each tile be itself a grid of polygons so we can have more detail, and will make a simple procedural heightmap. After that I’ll look at taking a Delaunay Triangulation and cutting it up into a grid then inserting it into Detour.
